Sunday, May 29, 2011

The Playhouse Part 3: Painting the Interior

While hubby slaved away at repairing a few exterior boards, I worked on the interior of the playhouse. This involved painting, painting and more painting. Yup, this little shed needed to be primed and painted from top to bottom. And while I enjoy painting, I don't love to paint ceilings in 90 degree weather. Actually, I don't love painting ceilings in the best of conditions.
Our first step was to head to Lowe's where we bought a cart full of paint.


  • 2 gallons of exterior primer (Valspar)

  • 1 gallons of exterior paint in a lovely sky blue (Valspar)

  • 1 gallons of exterior paint in white (Olympic)

  • 1 pint of green paint for trim and door (Valspar)

  • 1 gallon of exterior paint in pale yellow (Duramex Valspar)

  • 4 rollers to apply the paint designed for exterior surfaces
Yes, that's six cans of paint! Luckily, there was a sale on Valspar paint ($10 discount for every $50 spent). Total cost was around $130.00. I can already see that this little project is going to not be cheap!

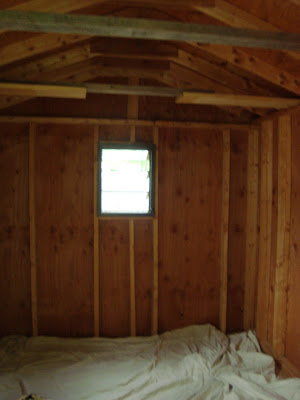
After thoroughly checking for interior damage, and finding none, I primed the interior of the shed.
Two evenings and about a gallon and a half of primer and I was done. This primer was very good and went on beautifully. I'm glad I finished this before before the weather hit 90 degrees. I love how much brighter the interior of the shed now looks.

Next, I painted the ceiling a lovely shad of light blue. Between the good primer and the regular flat exterior primer by Valspar, I only needed one coat of each and the ceiling was good to go. Can you tell I'm a fan of Valspar?


Note to self, do not do an arm workout the evening before you plan to paint a ceiling.

Then I moved onto the walls. I wanted to keep the light airy feeling, so I painted the walls white. Unfortunately, I had to paint two coats of white over the primer. I don't know why I bought Olympic paint, but I bet that if I had bought Valspar, I would have only needed one coat. What I do love is that I can still see the wood grain through the primer and paint.

Finally, I removed the drop cloth (which didn't seem to help at all) and decided I might as well power on and finish the floors as well. Instead of using the green as I had planned, I grabbed some leftover deck stain from our deck project last year. Yeah, it's bright red, but perfect for a playhouse! It's a Behr brand that worked very well (I also like Behr paint, but Lowe's is about 5 miles closer to our house, so I use Valspar more often).

After one quick coat of deck stain on the floor, this is what I was left with.

I love it! Now, the only thing left to do on the interior is adding furniture and accessorizing. I can't wait to add the little tables, hooks and curtains. Unfortunately, our next step will be painting the exterior. Stay tuned for that!

Saturday, May 28, 2011

The Playhouse Part 2: The Glitch

Like every single project I start, the playhouse project also ended up with a glitch making this simple project not so simple (hence my blog title).

Enter the problem: water damaged boards on the exterior. Fortunately, the interior was in perfect shape. No water damage of any kind was evident.The damage looks worse than it actually is. Thank goodness for my wonderful hubby! He stepped into save the day (well, evening since it was after dinner).
For some crazy reason, hubby is wearing safety glasses, but no shoes while operating a saw. I asked him not to do this, but he ignores me. Hubby doesn't enjoy DIY home projects. So, I try very hard not to make suggestions or nag too much when he agrees to do unnecessary household projects.


Hopefully, this will be the only glitch in the playhouse project.

Wednesday, May 25, 2011

Playhouse Part 1

Despite that we have a to-do list full of home projects, I have ditched all those and started a new one. My husband is almost thrilled. We are turning our old shed into a play house for our kids! The kids are growing up so quickly that I want to get this done for them ASAP! Or maybe I just always wanted a play house of my own and am now living vicariously through my children. Does it really matter? In either case, the kids are getting a playhouse.

Here she is, in all of her glory, the soon-to-be playhouse!
Yeah, it's ugly, but very solid. It reminds me of our house when we first bought it. So, I know it had loads of cute potential! The shed originally housed our tools and yard equipment. However, we have half a garage that is more than big enough to contain these items.

To the right of the shed is a lovely box we use as a yard waste/worm bin. In the picture, you see a bunch of stuff piled up in it because we are cleaning the yard. There are two windows that unfortunately look out into the neighbors' yards. I would have loved to see some of those windows from our yard. And finally to the back of the shed is our compost bin. It'll have to stay here as it's the only place that makes sense for a compost bin in our yard.

The inside of the shed is pretty basic. It's unpainted plywood. Yeah, that's going to be so fun to paint.
As soon as it stops raining, I'm going to start my paint-a-thon of 2011. This puppy will easily take 6 gallons of paint, maybe more. Despite the work ahead, I am so excited. My kids are going to be thrilled. My son even started hinting around how great it would be if we would like the kids play in the shed like it was a little kid's house. I want to keep it a surprise, so I told him that it was for our gardening equipment.

So, what's the plan? I actually have two plans; one for the interior and one for the exterior.
Exterior
*Paint the shed pale yellow to match the house
*Paint the trim yellow and green to match the house
*Add an address sign
*Add landscaping (some strawberry plants, clematis on a trellis and two bushes)
*Add two little chairs and table to lounge around outside

Interior
*Prime ceiling and walls
*Paint ceiling blue, walls white (maybe) and floor green
*Add hooks to hand toys, coats, and bikes
*Bring in table, shelf and toy box (already own)
*Add a lovely little indoor/outdoor rug
*Add some cute curtains

I'll start on the interior first before we really start seeing 90 degree weather. Hopefully, the rain will let up for a few days and my husband and I can get started painting. I'm so excited for the kids, that I doubt I'll lose focus on this project any time soon!