Life has been incredibly stressful lately. And when I get stressed, I shut down and ignore my blog. I've been dealing with some mild health issues and trying to stay afloat of our daily life. Hopefully as things start to get better (or worse, I don't know), I'll be able to post more.
Since my last post, we've:
1. Bought new windows because every window in the house was a single pane, 1960s window. Two of the windows even boasted broken glass. It needed to be done, but 20 windows was pretty expensive. I'm looking forward to being able to clean the glass and water my flower boxes without taking my life into my own hands. Unfortunately, the install will be in September, but it's worth the savings!
2. The kids and husband spent a few days in North Carolina. Trust me, it was a vacation for me too!
3. We had a beach day with my mom, sister and niece and have a wonderful time!
4. My daughter turned 4 years old! Holy cow! We bought her a bike, and celebrated by going to the beach and baking her a strawberry pink cake. My daughter hates birthdays and cried every single time someone wished her happy birthday. She hates the birthday song and is terrified that someone will sing it!
5. I rearranged the house yet again. I moved the dinning room into the living room and the living room into the family room. The guys measuring our windows are confused as hell. I wonder if I should mention I plan on playing musical bedrooms in the next month...
I'm really looking forward to my son's birthday coming up in two weeks. I plan to make him a chocolate sheet cake with his favorite toy on top. As for gifts, he's getting a zoo-zoo pet, a desk lamp and we're moving his room and redecorating it. That's what he wants! I can't wait!
Thursday, July 29, 2010

Monday, June 7, 2010
Hitting the Deck!
I love our deck. It's a second story, covered deck that looks out over our back yard. The location and roof allow for cool breezes to pass through while keeping the hot sun off my pasty face. I spend hours lounging on the deck, reading, talking with friends or watching my kids play below.
Unfortunately, the deck is old and is definitely showing its age. The red color was peeling off and the wood was cracking. It had only been 2 years since we last stained it! The husband and I decided that it needed a good cleaning and staining to take it from a peeling, rough mess, to a smooth place to relax again.
Our first step was to power wash the deck and house. We rented a power washer from Home Depot for $75.00 a day. After researching our options, I found the best deal for us was to actually rent a unit. Most washers within our budget offered too low pressure and/or multiple complaints that the washer broke after one use. Plus with a rental, we don't have to store one more thing in our shed!
As usual, I totally forget to get a before shot.
 When it comes to deck stain, price wasn't our primary focus. We wanted quality. The last stain we used went on very poorly. The stain went on spotty and it actually peeled up within a few days of application. I wish I could remember the brand, so we can avoid it forever and ever. Anyway, I happen to love Behr interior paint. It goes on so smoothly and evenly. Additionally, Behr deck stain was only $25.00/gallon with a $5.00 rebate. This was more than $13.00 cheaper than any other brand we checked out. So, we decided to try it out and boy are we glad we did!
 But so much more relaxing! Onto the next item on our list!
Unfortunately, the deck is old and is definitely showing its age. The red color was peeling off and the wood was cracking. It had only been 2 years since we last stained it! The husband and I decided that it needed a good cleaning and staining to take it from a peeling, rough mess, to a smooth place to relax again.
Our first step was to power wash the deck and house. We rented a power washer from Home Depot for $75.00 a day. After researching our options, I found the best deal for us was to actually rent a unit. Most washers within our budget offered too low pressure and/or multiple complaints that the washer broke after one use. Plus with a rental, we don't have to store one more thing in our shed!
As usual, I totally forget to get a before shot.
Imagine a picture of a peeling, ugly deck floor here. Thanks.
Step two was to stain the deck. Because our deck was already stained red, we decided to just keep staining it red. After researching various stains brands, we settled on Behr.
When it comes to deck stain, price wasn't our primary focus. We wanted quality. The last stain we used went on very poorly. The stain went on spotty and it actually peeled up within a few days of application. I wish I could remember the brand, so we can avoid it forever and ever. Anyway, I happen to love Behr interior paint. It goes on so smoothly and evenly. Additionally, Behr deck stain was only $25.00/gallon with a $5.00 rebate. This was more than $13.00 cheaper than any other brand we checked out. So, we decided to try it out and boy are we glad we did!This stain went on evenly and smoothly. We didn't use a paint sprayer as I'm afraid that would have made a huge mess of our freshly washed siding. We used good old fashioned paint brushes. This stuff is so awesome, we only needed to apply one coat. After only 5 hours of manual labor in 90+ degree, super humid weather (because that's the only kind of weather here), we had a lovely, if not bright red deck.

Yup, it's definitely red!
 But so much more relaxing! Onto the next item on our list!
Tuesday, June 1, 2010
Slow and Steady-The Kitchen Table
Amazing things happen when you're not paying attention. Today, I stepped back and noticed all the work hubby and I have accomplished over the last month on a very limited budget.
The first project begging to be completed was our kitchen table. I enjoy cooking and spend a lot of time in our eat-in kitchen. The kitchen set stared at me every day begging for help. This was the first piece of furniture given to my husband and I. My grandmother bought this for us at an antique auction (though I doubted it was actually antique, vintage yes, but not antique!). My grandmother was one of my best friends and unfortunately, she passed away about 6 years ago. Consequently, the table holds sentimental value and I will not get rid of it. Bring on the sander!
Unfortunately, I am too impatient to get before pictures, so my afters are never that awesome. Oh, well. Next time, right? I finally finished staining and painting our kitchen table. The last 10 years of cooking, crafts and school work were very much evident. From broken spindles to worn-off stain, this table set needed help!

Sorry, this is the only picture I have of the table. As usual, I don't have a picture without a kid or dog evident. This picture really does show how worn the edges of the table were.
I sanded the table top down until it was completely bare. I added cherry finish and 3 coats of poly and ended up with this!

Look, not dog or kid in the picture (pay no attention to the dog bowl!).
Next up were the chairs and table base. Because I'm too lazy to prep all those spindles I wanted to change things up a bit, I decided to spray paint and poly these guys a lovely blue.

And here is the table set now.
 There are four matching chairs, but I use the highchair for our daughter. Since I'm not trying to sell our house, I see no reason to stage it for anything other than our everyday use.
 And finally, here is the table and chairs as seen in the kitchen.

Now my beloved table and chairs looks fun and fresh in our kitchen. I searched through the house and came up with the shelves, plates, pictures and cornucopia to freshen up our eating nook even more. The best part? Now, the table is a cinch to clean. Food and liquids wipe right up without leaving stains.
Total cost of the makeover was around $35 for spray paints, stain and poly.
Friday, April 23, 2010
Refinishing The Kitchen Set
What do you call this?
 Or this?

Progress!
Not only is this maple table and chair set a sturdy solid wood, it also has sentimental value. My grandmother bought the set for me and my fiancee (now husband) at an antique auction. It was the very first piece of furniture we received for our new lives together. So, despite that the style of table isn't something that we love, nor has the last ten years been kind to the finish, we, okay I, cannot replace it. To make the set more fun and to suit our taste more, I decided to refinish the table and paint the chairs. I truly considered refinishing the chairs. But did you see all those spindles? That's nuts! I need color other than maple!
I spray painted the chairs peacock blue and refinishing the top of the table. The only thing left is the table base. I cannot tell you have good it feels to make some progress. My goal for next week is to finish up the table base and put our kitchen back together!
Thursday, April 22, 2010
Third Times a Charm?
I am wall decor challenged. I require several attempts to get my wall decor to not suck look right. For example, I started out with this lovely vintage quilt and quilt rack.  While I loved it, the quilt didn't really work for the look I was trying to achieve. So, out went the quilt and rack and in came some plates and pictures.
  But, I decided the pictures weren't really working for me either. In came a mirror that I found around the house and painted.
 The dining room is starting to look differently now. We added new peacock blue curtains (a total splurge), a rug (given by my mother) and a few new-to-the-room plants and accessories. Oh, the blue chairs belong in the kitchen. Look forward to a blog on the refinished kitchen set next week. When we have guests over for dinner, we just pull a kitchen set chair up to the dinning table for a funky, coordinated look.
  Unfortunately, the mirror was all wrong and I didn't love the plates. None of the items matched anything in the room. Enter the picture collage. I like the look of a picture collage, but wasn't sure how one actually achieved it. After studying pictures online, I decided to attempt it on my own using new pictures of my children, some kid art and wooden frames I had lying around the house.
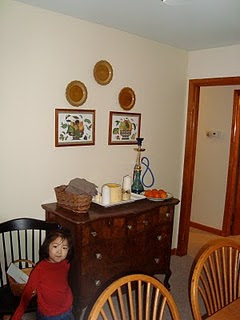
  I can finally say that this arrangement makes me happy because it includes only items I love. The middle pictures are my children from their photo shoot a month ago (a gift from my sister) and the other two pictures are art projects from my son. The picture to the left is an oil pastel and the picture to the right is a tissue paper creation. The hookah (no, we don't actually use it) was a fun little souvenir my husband picked up in the Middle East last summer and the plant was also a gift from my husband. The peacock plate was a gift from my mother. And finally, the dresser is a family heirloom that only adds to my enthusiasm over the wall make-over.
While I loved it, the quilt didn't really work for the look I was trying to achieve. So, out went the quilt and rack and in came some plates and pictures. But, I decided the pictures weren't really working for me either. In came a mirror that I found around the house and painted.The dining room is starting to look differently now. We added new peacock blue curtains (a total splurge), a rug (given by my mother) and a few new-to-the-room plants and accessories. Oh, the blue chairs belong in the kitchen. Look forward to a blog on the refinished kitchen set next week. When we have guests over for dinner, we just pull a kitchen set chair up to the dinning table for a funky, coordinated look. Unfortunately, the mirror was all wrong and I didn't love the plates. None of the items matched anything in the room. Enter the picture collage. I like the look of a picture collage, but wasn't sure how one actually achieved it. After studying pictures online, I decided to attempt it on my own using new pictures of my children, some kid art and wooden frames I had lying around the house. I can finally say that this arrangement makes me happy because it includes only items I love. The middle pictures are my children from their photo shoot a month ago (a gift from my sister) and the other two pictures are art projects from my son. The picture to the left is an oil pastel and the picture to the right is a tissue paper creation. The hookah (no, we don't actually use it) was a fun little souvenir my husband picked up in the Middle East last summer and the plant was also a gift from my husband. The peacock plate was a gift from my mother. And finally, the dresser is a family heirloom that only adds to my enthusiasm over the wall make-over. Truly the best advise I ever read on decorating is to use only what you love. If you follow this, you'll have more fun, and you can't go wrong. Or if you do something that is "wrong", you don't care.
Wednesday, April 21, 2010
PB&C Cookies
Last night, the kids (okay, and me too) were clambering for cookies. Unfortunately, when I checked my baking supplies, I found that I didn't have enough flour to make most recipes I know. So, I came up with my very own recipe using only the ingredients I had on hand (which wasn't many).
With no flour, eggs, brown sugar or butter, imagine my shock at how good these cookies turned out! My husband loved them and my co-workers requested the recipes. I hope you all can enjoy them too.
PB&C Cookies
Ingredients
*1 Cup sugar
*1 Cup corn syrup
*12 oz jar peanut butter (crunchy or creamy)
*2 Tbs vanilla extract
*6 Cups Corn Chex cereal
Directions
In a sauce pan, bring sugar and corn syrup to a boil. Remove from heat. Add peanut butter and vanilla extract and stir until smooth. Add in cereal one cup at a time. Stir until cereal is thoroughly coated. Scoop out tablespoons of mixture onto wax paper and refrigerate.
Sorry there are no pictures. They were eaten before I even thought to take a picture.
With no flour, eggs, brown sugar or butter, imagine my shock at how good these cookies turned out! My husband loved them and my co-workers requested the recipes. I hope you all can enjoy them too.
PB&C Cookies
Ingredients
*1 Cup sugar
*1 Cup corn syrup
*12 oz jar peanut butter (crunchy or creamy)
*2 Tbs vanilla extract
*6 Cups Corn Chex cereal
Directions
In a sauce pan, bring sugar and corn syrup to a boil. Remove from heat. Add peanut butter and vanilla extract and stir until smooth. Add in cereal one cup at a time. Stir until cereal is thoroughly coated. Scoop out tablespoons of mixture onto wax paper and refrigerate.
Sorry there are no pictures. They were eaten before I even thought to take a picture.
Monday, April 12, 2010
Why Isn't It Shrinking?
And by it, I mean the to-do list! Our list was reasonable:
1. Finish the laminate flooring in our family room-80% done!
2. Finish the stairs-started!
3. Repaint/redecorate the family room-80% done!
4. Refinish/repaint the kitchen table-started!
Just as we were finally making progress on our house projects, spring has arrived with it's annoying sunny warm weather, beautiful new flowers and green grass. The nerve!
Now, we are looking at the gardens that need weeding, the lawn that needs seeding and the deck that really, really needs refinishing. Oy. In an effort to keep me from freaking out, we chose not to do the veggie garden this year and concentrate on maintenance stuff only. I know I'm going to miss it terribly, but I really do not have the time.
Stay tuned for picures of our newly decorated family room, staircase and kitchen table set!
1. Finish the laminate flooring in our family room-80% done!
2. Finish the stairs-started!
3. Repaint/redecorate the family room-80% done!
4. Refinish/repaint the kitchen table-started!
Just as we were finally making progress on our house projects, spring has arrived with it's annoying sunny warm weather, beautiful new flowers and green grass. The nerve!
Now, we are looking at the gardens that need weeding, the lawn that needs seeding and the deck that really, really needs refinishing. Oy. In an effort to keep me from freaking out, we chose not to do the veggie garden this year and concentrate on maintenance stuff only. I know I'm going to miss it terribly, but I really do not have the time.
Stay tuned for picures of our newly decorated family room, staircase and kitchen table set!
Subscribe to:
Posts (Atom)