Showing posts with label decorating. Show all posts

Wednesday, July 6, 2011

Simple. Ha!

About a week ago, I noticed that one of the fluorescent bulbs in one of our kitchen light fixture was dim. So, I decided to replace the bulb. However, changing the bulb didn't do the trick.
This isn't the light, but it's what the light looked like. This picture is from our downstairs kitchen. Same light, different location, both ugly. You get the point.


Now I had a decision. I could:


A. Try to fix the old, ugly florescent light box, or


B. Go buy a new one already

After consulting with the husband who apparently hated the light fixture (who knew?), I drove on over to Lowe's to check out new light fixtures. I had a few criteria in mind when shopping.


  • Not the light box florescent type of light

  • No pendent lights. This fixture will be directly over the kitchen sink/counter where we stand frequently. I am tall (6'0) + we have ceilings that are not high. Consequently, pendent lights, if they don't hit my head are just uncomfortable hovering just over it.

  • We'd like a darker color such as black or oil rubbed bronze to match out other light fixtures (but I wasn't afraid to paint if I found something

  • Inexpensive-as in under $50.00

  • Both hubby and I had to like it

I quickly found a much more updated, non florescent light box type fixture for $40.00. It was the last one in stock and it was originally $59.00, so I snagged it.

This isn't the exact fixture, but it looks similar. See it fit all my criteria!


I was excited when I arrived home, so I wanted to install the new light right away. I turned off the electric (always a good idea!) and went to work removing the light fixture. Imagine my delight to find not one , not two, but THREE holes hidden under that box. Only one of the holes was needed for the electrical wiring. The other two were just delightful little surprises. Since the new fixture wouldn't cover the holes, I now realize that I have to patch the ceiling.


Which means...


I have to now patch and paint the ceiling. Ugh. I hate painting a ceiling. Furthermore, I am incapable of painting a ceiling without getting little splatters all over the walls. So, I'll also have to touch up (at a minimum) the walls and pray that the colors still match. This simple little fix was turning into a total room makeover.


After a minor attitude adjustment, I realized this was not a problem, but an opportunity to tweak a kitchen that I have never, ever been able to get quite right. This kitchen has been 4 colors in the last 6 years. The rooms has been cream, colonial blue, yellow-green and light gray-green. After reading tons of blogs and advice online, I *think* my problem is that I was using muddy colors next to my gray counters, white trim (originally stained) and white/black tile. The result was a bit gloomy


First things first, I had to start at the top, err the ceiling that is. I patched the holes. I just crumbled up some paper, stuffed it into the holes and covered it with mud-a neat little trick my father taught me when I was 16 years old! And what do you know, it covered pretty well! A little sanding later and I was ready for to paint the ceiling. Finally, 3 days after trying to fix the original light, my lovely husband hung the new light fixture!


When we flipped the switch to the light, we were astounded at how bright our kitchen became. Hubby suggested we get lower wattage bulbs and I agree... when these burn out that. We really like the new track light fixture. It does a lot to update our outdated space for very little $$.

Next stop, painting the walls because I splattered ceiling paint on them. Fingers crossed, new paint will help brighten up our kitchen even more!

Sunday, June 19, 2011

What I've been Working On

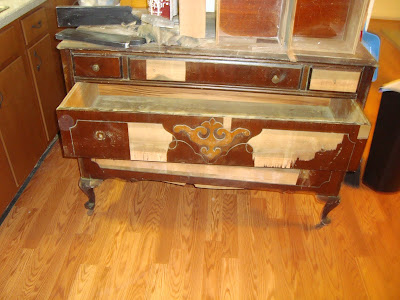
What exactly is this? This is a hot mess that's what!To be more specific, this is an old dresser that is part of a bedroom set belonging to my mother (additional pieces include a vanity and headboard in equally bad shape). Unfortunately, my mother had to put this little dresser, who once upon wasn't such a mess, into storage. Even more unfortunate is that her storage unit flooded ruining majority of her furniture. It was awful to see beautiful wood furniture warped and pealing beyond repair. Many of the items held sentimental value to her. This dresser was one of those items that had more sentimental value than monetary value. While old, it was made from cheap pine and laminate. Fortunately, the water damage, while bad, wasn't impossible (for me) to repair. None of the wood was warped, but the laminate was pealing. This I could work with!

So, I've been working on this dresser and the matching vanity for the last two months. Yes, I am that slow. I've been peeling, stripping, patching and sanding these pieces over and over and over again. I'm not going to lie, this project hasn't been easy. And had it just been for me, I would have just scrapped the thing. But I'm working on this for my mom. Hopefully, when she sells her current home, she can find a place in her new home to fit her precious family antiques.

Here's a sneak peak of the project so far. I think this shabby chic paint job is kind of interesting, but I know my mother would hate it, so this is an in-between peak. More to come!

Goodwill Finds!

I often browse at our local Goodwill, but rarely buy anything. I'm pretty picky what comes into our house and I rarely buy anything I wasn't looking for already. For example, I am currently looking for
1. Picture for our bedroom
2. A few lamps for various rooms in our house
3. Butcher block table top

Imagine my delight when I walked into Goodwill and found this delightful little oil painting that matched the colors in our bedroom perfectly! It's signed and dated 1983!
It's a bit brighter in person which I really like. Our room is a bit dark and had a lot of hand-me-down 70s furniture. The picture matches the style of the bedroom perfectly! I paid $8.00 for the oil painting.
Next, I found this lovely floor lamp with a fantastic milk glass shade. I love milk glass and buy milk glass serving bowls for daily use for serving food and displaying in our kitchen. The base is also pretty heavy in comparison to many of the floor lamps I find in thrift stores(or regular stores for that matter!). I paid $15.00 which is what our Goodwill charges for all floor lamps

This lamp is perfect for our bedroom as it provides a light source for us as soon as we enter into our room (there are no light switches).

And finally, I found this adorable little desk lamp. I've got a few ideas on where to use it, but for now, I'm still undecided.
I paid $4.00 for this little beauty.

Notice that my lamps were antiqued gold? I am so glad this color metal is coming back. While I like the chrome/pewter look that we've all seen in the last trend, it matched nothing I owned (unless you include our faucets). Yeah for old becoming new again!

Tuesday, April 19, 2011

Mission Private Bathroom: Complete

The bathroom is finished! The bathroom is finished! Well, 95% finished (because nothing is ever 100% complete in this house) and I am so happy with the results. Come on in and take a look!

Here's what I started with when we bought the house 6 years ago. The tub and tile is original to the house (1966). I didn't hate the tile, but it was pretty cracked, so it really had to go. Oh, and did I mention there was no electrical outlet? Where's a girl to plug in her hairdryer?
This is the only before picture I have. It's circa 2007. Turns out, I hate taking pictures of ugly.

Two years ago, we had the tile removed and replaced with a neutral tan tile, new tub, sink and toilet replaced and wainscoting installed. Yes, I hired this job out because my husband was deployed overseas and I didn't feel confident replacing old plumbing. After witnessing all the problems the professionals had, I'm very glad I didn't bother. Gosh I'm getting sick of wainscoting. Probably because I read way too many decorating blogs, but it's going to stay. I originally painted the walls light blue, but never removed the window into our laundry room. Honestly, the bathroom was never completely finished. Until now, that it!

And here it is today.


Our first step was getting the exhaust fan installed. Cost of the exhaust fan was around $115.00. Installation (no, we do not diy electrical anything!) was around $280.00. The electrician was here four hours-2 hours longer than anticipated, so the $280 was very inexpensive for his time!

Quite a nice change from the gaping hole (which I did patch myself thankyouverymuch!).

Step two, was to patch the cracks in the ceilings. The ceilings had been patched a time or two and I knew cutting a hole into the ceiling to install the exhaust fan would cause the cracks to resurface. I was right. Fortunately, only 1 coat of mud and 1 round of sanding did the trick.

Then, I took a hammer and knocked out those shutters leaving us even less privacy. I was hoping this would spur hubby into action. Alas, his school work (yes, I got me a college man) was too much, so I had to wait for our window to be covered.

Yes, that is the view from my bathroom looking into my laundry room/bedroom closet. This room also needs MAJOR work. Let's ignore that for the next year now.

So, I moved onto the fun part, painting. I painted the ceiling (gah!) ceiling white by Olympus. It's a splatter proof brand that we've used it the rest of the house, It's not as white as most ceiling paints I've used in the past. For the walls, I used Valspar's Brooklyn Brownstone paint in a semi-gloss finish. I am in love with Valspar paint. The walls only required two coats of dark brown to cover the light blue. It looks just like chocolate pudding, too! The trim was painted brilliant white (more leftover trim paint) and I didn't touch the wainscoting that was already white.

Finally, hubby stepped in and patched the window. It only took two days of constantly interrupted work, but he finished it. I caulked and painted it in one night because I was so excited to be done.

I'm not sure what I'm going to put in that niche. we're considering a shelf, a monograph or a picture. Putting little ceramic knick knacks isn't the best idea because this bathroom is for my kids , my very active kids. So, I'm leaving the niche blank for now until I come up with a better idea than a vase of flowers.

And for your viewing pleasure, a few more shots of the bathroom.
I used lime green accents to tie it into the adjacent room (the family room).

The ubiquitous Target bird picture. I bought this picture and it's mate from Target several months ago. Turns out, so did everyone else. I've seen it pop up on several decorating blogs in the last month alone! The blue bird picture is currently found in our family room (for now).

Now, if you'll excuse me, I'm going to enjoy some private time in my newly decorated bathroom.

Friday, April 15, 2011

Kitchen Art, or Refrigerator Not Needed

Recently, I was struck by inspiration. I love when that happens! I love kid art and I love encouraging my kiddos to create, but putting artwork on the refrigerator got to be very overwhelming. Do you realize how much art kids bring home from school? It's insane! On a few blogs, I noticed cork boards hung full of children's art and thought this the perfect solution for our family. I present you with my kitchen cork board.

This awesome cork board not only holds many examples of my children's artwork, but it also frees up refrigerator real estate. No longer do I have to worry about opening the refrigerator fearing an attack of paper (or twelve). This cork board allows for easy rotation of art and less mess since it's not moved until I move it intentionally! Last and certainly not least, this rotating art feeds my need for constant change and lots of color!

I made this cork board using:
1. 1 Giant Frame bought at Michael's (with their 40% off coupon): $12.00
2. 6 Cork squares $10.00
3. Blue spray paint $3.00
4. Caulk $1.00
5. Hot glue had on-hand

This project almost beat me. I couldn't find a pre-made cork board big enough, so I used a large picture frame without the glass. However, once I hot glued the cork to the cardboard backing and hung it up, the cork sagged away from the top of the frame. My problem was that when I replaced the glass with the cork board, the frame no longer fit together very well. See that sagging? It was ugly. It was also proof that a this board wasn't going to hold up to rotating pictures.

Enter my new BFF, caulk. I caulked around the back side of the frame filling the the gaps between the cardboard and the frame and let it dry overnight. Finally, no sagging (well, at least no sagging cork board).

Master Bedroom Makeover that Turned into a Bathroom Makeover

Two weeks ago, I decided that I tired of looking at our fugly master bedroom and vowed to do something about it. This room, has been the most challenging to decorate in our house so far and it doesn't even have plumbing or electrical issues! Well, maybe it sort of, indirectly does.

This is a tale of project creep.

Our master bedroom was a disaster. We ripped up nasty carpet and replaced it with laminate flooring, oh back in July and never put any of the baseboard moulding back.

We put laminate flooring in the entire bottom floor of the house. Since this was the very last room, it was full of toys, exercise equipment and general nastiness. Unfortunately, last month, we has a major toilet leak that pretty much ruined all the new flooring in our bedroom. Oh well, time for plan B-carpet. Hubby and I were done with laminate and less than impressed with how it's held up, anyway. Yes, I am fickle.

You can see that the room is paneled and has cheap-y built-in bookshelves. In another life, this room was used as a family room, a toy room and an exercise room, but we wanted to sleep on the same floor as the kids, so this room became our master bedroom. That and we couldn't fit our furniture in the other 12' X 13' rooms in the house. Oh, the joys of an older homes-no master bedroom!

Typical of me, I never did take a picture of the master bedroom set up as a bedroom. In case you weren't aware, I suck as a blogger (as if my lack of posts wasn't already a big clue).

Finally, I decided to make our bedroom something that didn't embarrass me. One of the many problems with our bedroom is that it has a exterior door to our back yard. People are always walking into our house through that door. I don't know why our friends and family can't use our front door! At least the UPS guy does!

I painted the walls (using paint I already had), and caulked/painted all the trim white. For the record, caulking is hard! It looks so easy, but causes so much flipping mess! Hubby finally finished installing the moulding (all 7 pieces). I even made curtains (using stitch witchery) because long panels didn't fit with the chair rail height shelf found on 2 of the 4 walls (I hate that shelf!). We even had a new door and windows in stalled. The room was looking good, or at least, much better then what it had looked. The final step was to install carpet. And that's where I ran into problems and project creep.
1. Before we can get new carpet, we have to fix the plumbing and flooring issues in the master bedroom closet. FYI-this closet houses our washer and dryer.
2. Before we can fix the flooring/plumbing in the master closet, we have to remove/replace some walls.
3. And while we are removing/replacing walls, we might as well remove/cover-up the window that looks out from our master closet directly into one of our bathrooms. Yeah, privacy is a problem. I mean, it was great that I could fold laundry and watch my kids bath at the same time, but that time is fast ending and we all would really like some privacy when using that bathroom.
4. Before we cover that interior window, we need to install an exhaust fan into the bathroom because there is no other ventilation in that room.

Gah! That's where I am now. I'm working on the bathroom, so I can work on the master closet/laundry room, so I can finish up my bedroom makeover.
The plantation shutters in the pic is the window that looks out into my laundry room. While it looks like it provides some privacy, it doesn't really. There is one slat missing and it cannot be replaced (not by someone of my skill level anyway). The location of the missing slat is in the perfect position for viewing any and everything which is why I can watch my kids while doing laundry. Additionally, sounds are not muffled at all (if you know what I mean!).


Oh, see that hole? Yeah, I had to patch that 2 years ago. I know that as soon as we cut a hole in the ceiling to install an exhaust fan, the patch will crack and have to be repaired. I like repairing drywall almost as much as I love to caulk. I'm about as skilled too.

I should mention that these bathroom pictures are more than 2 years old. We have since had tile and bead board installed. So, it's much, much nicer, but not great. Hopefully, it's about to look great!

New step #1. Work on bathroom

So, let the games begin. I'll be showing my progress (I promise this time) on each of my steps (no, really).

Tuesday, June 1, 2010

Slow and Steady-The Kitchen Table

Amazing things happen when you're not paying attention. Today, I stepped back and noticed all the work hubby and I have accomplished over the last month on a very limited budget.

The first project begging to be completed was our kitchen table. I enjoy cooking and spend a lot of time in our eat-in kitchen. The kitchen set stared at me every day begging for help. This was the first piece of furniture given to my husband and I. My grandmother bought this for us at an antique auction (though I doubted it was actually antique, vintage yes, but not antique!). My grandmother was one of my best friends and unfortunately, she passed away about 6 years ago. Consequently, the table holds sentimental value and I will not get rid of it. Bring on the sander!

Unfortunately, I am too impatient to get before pictures, so my afters are never that awesome. Oh, well. Next time, right? I finally finished staining and painting our kitchen table. The last 10 years of cooking, crafts and school work were very much evident. From broken spindles to worn-off stain, this table set needed help!
Sorry, this is the only picture I have of the table. As usual, I don't have a picture without a kid or dog evident. This picture really does show how worn the edges of the table were.

I sanded the table top down until it was completely bare. I added cherry finish and 3 coats of poly and ended up with this!

Look, not dog or kid in the picture (pay no attention to the dog bowl!).

Next up were the chairs and table base. Because I'm too lazy to prep all those spindles I wanted to change things up a bit, I decided to spray paint and poly these guys a lovely blue.


And here is the table set now.
There are four matching chairs, but I use the highchair for our daughter. Since I'm not trying to sell our house, I see no reason to stage it for anything other than our everyday use.

And finally, here is the table and chairs as seen in the kitchen.
Now my beloved table and chairs looks fun and fresh in our kitchen. I searched through the house and came up with the shelves, plates, pictures and cornucopia to freshen up our eating nook even more. The best part? Now, the table is a cinch to clean. Food and liquids wipe right up without leaving stains.

Total cost of the makeover was around $35 for spray paints, stain and poly.

Monday, April 12, 2010

Why Isn't It Shrinking?

And by it, I mean the to-do list! Our list was reasonable:

1. Finish the laminate flooring in our family room-80% done!
2. Finish the stairs-started!
3. Repaint/redecorate the family room-80% done!
4. Refinish/repaint the kitchen table-started!

Just as we were finally making progress on our house projects, spring has arrived with it's annoying sunny warm weather, beautiful new flowers and green grass. The nerve!

Now, we are looking at the gardens that need weeding, the lawn that needs seeding and the deck that really, really needs refinishing. Oy. In an effort to keep me from freaking out, we chose not to do the veggie garden this year and concentrate on maintenance stuff only. I know I'm going to miss it terribly, but I really do not have the time.

Stay tuned for picures of our newly decorated family room, staircase and kitchen table set!

Tuesday, March 9, 2010

Find of the (Mid) Century!

Last Friday, during my lunch break , I drove on over to our local Goodwill for some fun. I'm only looking for furniture [right now] and was on a very limited schedule, so I carefully avoided the clothing and book sections. And there it was. Have you ever experienced that moment when you found your it? The exact item you never knew you needed, but knew you needed?

There in all it's glory was this entertainment center.

Oh dear. It's exactly the style my husband likes and wants for our family room-mid century modern. I approached the piece slowly lest someone else realize how awesome a find this was. The piece was in good shape. It even had dovetail joints and groovy 70s drawer liner. And we needed a new entertainment center to hold games and toys. The last one we owned (a horrible shabified yellow monstrosity) met up with our son in a dark room and didn't come out alive. Oh, it gets better. Total cost? $12.00. Yup, my pulse started to quicken. This was it! And it must be mine!


But wait. I didn't have the truck, nor does Goodwill hold anything. I rushed back to work, called Carl (the husband who owns a truck)and begged him to pick up this fine piece for me after work. This guy, he didn't even ask why. He just went to Goodwill, bought me that $12.00 entertainment center along with a bouquet of wild flowers and brought it home.


Truly, I don't know who was more excited, me or the kids. They knew exactly the purpose of the entertainment shelf as soon as they saw it-our new toy and game storage. The spent the rest of the night putting all their toys into the unit and exclaiming over its awesomeness. I may have created monsters.


Wednesday, March 3, 2010

I Am A Turtle

Why did no one warn me that home improvement can hurt! No, we didn't have any major accidents. I'm talking muscle fatigue. I run, do step aerobics, kick boxing, and various other workouts several times a week. None of these things have prepared me for laying a laminate floor.

Carl and I are currently plodding our way through our laminate floor installation project and it is taking us For-Ev-Er! We started on Sunday afternoon. It's now day 3 and we're maybe halfway done. Dang day jobs are just getting in the way. Add in feeding, bathing and homework with the kids and it makes for snail pace progress. At least there is progress, right? I just have to be patient and look on the bright side.

So, what is the bright side? Well, since we have a good portion done, I can already see that I love the floor. It looks great. Another bright side is the skills I'm acquiring. Hey, I can lay laminate floor with no help (not that I want to). I've also learned how to use our circular saw and the correct way to measure. Finally, and most importantly I'm learning patience-one thing I've always needed to work on.

Monday, March 1, 2010

Unexpected Progress!


Have you ever had unexpected progress? Recently, Carl (the husband) and I decided to fix up the family room. The plan was, well, wasn't even much of a plan. We has a direction-sort of. We're thinking something "grandma chic" (Carl's terms, not mine). So, something sorta mid-century modern-ish for my husband with some tranditional thrown in for me.
With this direction in mind, we've been searching through Ikea, Craigslist and Goodwill for furniture and accent peices. While we found some furniture we liked, nothing inspired us. We had no inspiration piece to work with. In the past, I've used art or fabric as inspiration pieces. I suggested that we try to find a really cool rug to work with, but unfortunately, the only rugs Carl likes are the flotki or sheepskin looking rugs. I'm pretty sure that these rugs will not stand up to two children, one eighty-pound doggy and one spiteful cat. So, we're still looking. Maybe one of those Sisal rugs?
While I am in no hurry to complete this renovation, something happened to speed it along. Enter, a sale on laminate flooring. That's right, laminate flooring went on sale at Costco for more than $8.00 off per box. This equals over $280.00 in savings if we bought it in February. So, Carl bought about 700 sq. feet of flooring, loaded it up on the truck and brought it home. And there it sat for about a week.

And then something wonderful happened. Carl started ripping up our gross carpet. Ever rip up carpet? Makes you never want to have carpet ever again! And so, we have officially started laying our new floor and I love it. Well, the floor, not actually installing it. So, right now, the house is a disaster and everyone feels discombobulated, but we are loving the progress. Bonus points for the floor since we've already has polyurethane, blood and vomit wiped right off of it (oh, the joys of parenthood). Here's a peak of the flooring so far!.

Monday, February 15, 2010

Compromise

My husband and I have been married a little more than ten years and in those years, we have both learned to compromise. Luckily, neither of us is particularly stubborn. One area of compromise has been our house. Everything from purchasing it, to painting and decorating it was a compromise-mostly for hubby. I'm embarrassed to admit that I've struggled in this area. Hubby likes modern or retro looking stuff. He loves Ikea. I don't. Actually I like it alright. The problem is that our house is full of free, second hand furniture. The result was a causual, country, traditional mismash of stuff my relatives all liked at one point in the last 20-30 years. How in the world does danish modern fit into the mix? To be honest, I don't know. But, I think it's about time, we added some items into our home not because they are free, but because we actually like them. I want hubby to feel like our home reflects some of his personality too. With this in mind, I suggested that that hubby decorate our family room with furniture and accessories that meets his discerning taste. Suddenly, hubby wants to help with home projects! Jackpot!

Now, where do we start?

Let's look at the current state of our family room. It contains 1 new television on a cheap pine stand, 4 small storage cubes that act as toy boxes and 1 cheap, broken armoir full of games and toys. The picture below shows the room with an old couch that long since died (via the cat) and a treadmill that I used (really!) until it broke. Apparently, it's not uncommon for the repair of exercise equipment to exceed the cost of a new one! Neither item resides in our home any longer. The small child is still here and will likely show up in random future pictures.

And here is a view of the summer kitchen (aka the brewers kitchen).
I have painted this room 3 times since in the last 5 years. The first color was a beige-the wrong beige. It looked awful. The second color was a gorgeous rust, but it was so dark that I quickly tired of it. Finally, I painted it a light blue. It doesn't really suit me, that's all I know. My biggest problem is finding a color that works well with the wood trim and the black and white tile.

After tons of discussion, hubby and I realized we needed to do the following things:
1. Paint (again)
2. New flooring (I didn't mention the water damage and iron mark yet did I?)
3. Remove the shattered tile and replace it with something. This will also involve removing a window that looks out into our garage.
4. Put in the new AC unit (which we already have)
5. Get a couch for goodness sake! Maybe even a table?
6. Come up with some sort of entertainment system
7. Come up with some sort of toy storage
8. Accessorize!

I cannot believe how excited DH is about this project. He actually agreed to go window shopping for furniture ideas this weekend. I couldn't have been excited if he asked to help me clean.


Friday, February 12, 2010

Even Terrible Pictures Help!

I know I kinda suck at taking pictures. Clearly, that hasn't stopped me. Taking pictures of completed projects helps me see what is wrong or missing. Who knew? Well, probably a lot of people, just not me.

For example, taking pictures of our dinning room made me realize that the pictures are hung too high. It wasn't obvious to me at first because I'm tall (right around 6'). Eye-level to me may be 4 or 5 inches too high. Another example was in our living room window treatments. I always liked my sheer, off-white curtains until I saw the photos. The windows were screaming for window treatments with color.

Maybe this explains why I prefer my picture not be taken.

Simple Pleasures-Kid Art


What happens when you give two kids 4 jars of finger paints, a pad of paper and hours to create? Awesome kid art! I am the proud owner of many original pieces of kid art. I just pop the paintings into a frame with a mat. Instant wall art!

I love how it keeps the house more fun and casual-just like us!

Saturday, January 30, 2010

Gosh, I Have A Lot of Stuff!

If you read through my January posts, you'll notice that I've been on a home decorating kick. I've been trying to fix up our main floor as inexpensively as I can using stuff I have around the house. Our main floor consists of our kitchen, dinning room, living room, bedroom and a full bathroom. Incredibly I've been able to decorating all five rooms and the hallway on a very limited budget.

For all five rooms, I purchased:
1. Three pictures
2. Drapes for four windows
3. One rug
4. Four toss pillows

I used a lot more than just those items listed above to finish each room. The rest of the items were found in the house. Some items such as a wall shelf and plates were being used in a different room. The rest of the items such a candles, more plates, vases, plants and a wine rack were found in closets or drawers. It was like going on a treasure hunt!

Ironically, I pride myself on our lack of clutter. I make frequent trips to the Goodwill or Salvation Army. So, I'm not sure if I should be embarrassed that I have so much stuff laying around, not used, or proud that I did all the decorating on such a limited budget.

Regardless, I truly thrilled at how homey our little house is becoming right in front of my own eyes!

Thursday, January 28, 2010

A $100 Dinning Room.

Finally, our dinning room is starting to actually look like a dinning room and not just a room with a big table in it. I'm so excited, I thought I'd share.

So, what have we been up to? First, Hubby and I removed a wall. Turns out, that wasn't as fun as all you DIYers make it out to be. The walls were uneven and couldn't be patched evenly. Twelve layers of mudding and sanding later and we called it a day. We are still working on the flooring (that needed to be replaced since walls were removed), but that's another post. Oh, and we aren't done that yet.

Bye-bye wall!


After the wall was removed, and the dust cleaned, I was left with a pretty blank slate. The room was painted off-white, with off-white curtains and gross blinds. As for furniture, I had my grandmother's oak table and my Great Aunt's antique dresser. My challenge was to make this mess of stuff look like it belonged together. Oh, and as usual, the budget was tight.


The Plan:
1. Repaint the wall Antique White
2. Move Antique Dresser out of closet
3. Find new window treatments
4. Create a kid area
5. Hang some art and the wine rack
6. Accessorize


The After Shots

It's so hard to get a shot without a kid or dog in the picture. Anywho. Here it is, my dinning room.

Cost breakdown:
1. Paint: $20.00 (I had the brushes, trays and rollers)
2. Curtains: $40.00 (I reused the off-white voile ones and added brown voile)
3. Two new fruit pictures $32.00 (includes prints, mats and frames)
4. Rest of the accessories are from around the house. Yes, we have fresh flowers in our house most days. I just relocated them from our kitchen.

Grand Total: $92.00!

Now we can afford to stock the wine rack too!

Monday, January 11, 2010

Five Years Later


Five years ago, on a surprisingly balmy January day, we moved into our little house. On that winter day, we paused to take a look at the house before we walked in for the first time as the new owners. The house wasn't winning any design awards, or even admiring glances. It's a 1966 raised ranch complete with original bathrooms, black and white tiles and 70s appliances. The exterior had not been updated. Worse yet, there wasn't a bush or tree to be found on the small, 1/4 acre lot. Heck, there was barely grass as it was January. But, it did have what we needed-a move-in ready, 4 bedroom house with an in-law suite potential in the a good location within our budget. We could have afforded a nicer home, but we'd have had to look further away from our work, family and friends. Besides, I am a product of HGTV and thought we were up for the challenge.


This is our first view of the house. Yes, that is the front of the house. No, I didn't love it either. But I could see the potential. My husband may have hated it on sight. I may or may not have begged to put in an offer and my husband agreed. The offer was accepted the next day. Ah, 2004/2005 boasted a quick moving real estate market!


I loved this house for so many reasons:


*It was very structurally sound. The original owners (also the contractor) sold it to us and kept the house in good shape.

*I liked that it was so symmetrical.

*It has two, yes two kitchens (one for beer making and for food making)!

* It had enough room for our hopefully expanding family.

* The house was less than 10 minutes from our jobs, family and friends.

* The house was in a good school district.


Fast forward 5 years and we've seen a lot of changes in both our family and in our home. Our daughter joined our family in 2007. My husband has seen two tours in the Middle East. My mother and sister have moved in and then moved out. We've seen my son start school, learn new sports and developing his personality. We've all grown older and, dare I say, happier. Life has been good.


We love our home more and more every year. Each passing day, new memories are made. Because we enjoy our home, we are trying to slowly update it and make it more homey. Since we plan to live here until retirement (30ish years), we are making it a house we love, not a house that will sell. And that is so much fun!

By 2007, We'd already changed out the exterior by adding siding, brickwork, and landscaping. You can really see the brickwork and vinyl siding in this picture. What you can't really see is the 8 bushes/trees we planted. We couldn't afford mature/larger plants, so we bought the smaller ones. Well, 5 years later, each of these bushes are 3-6 feet tall each. We've also added rose bushes and an apple tree to the front yard, and extensive gardens to the back and side yards. Gardening is something we do as a family. I love looking at the pictures and seeing how our leland cypress's have grown almost a foot a year!


We still have so much to do both in side and outside the house. Again, it'll be done slowly. We're in this house for the long hull, so what's the hurry?


Tuesday, January 5, 2010

My Decorating Method


I have a confession. I love to read decorating and home improvement blogs. Love them! I can read them all day. In fact, I often do. All the DIY and decorating posts are inspiring. Unfortunately, our budget doesn't allow for me to acheive the beautifully decorating homes these talented DIYers display. Well, at least not quickly.

My "method" if one could call it a "method" is to slowly, and I do mean slowly, decorate/update our home using found treasures. I search through craigslist, local thrift stores, discount stores and even our own home to find just the right accessory to add to each room in our home.

Take my living pictured to the left. We've lived in our house 5 years and it took that long to even get to this transitional point. Everything on the mantel was found from inside our home just this week, the picture was orinally in our family room, but I loved it so much I decided to use it in a more prominent place in the house. The clock is an antique handed down by family members and everything in the curio was purchased on one of our travel adventures. We have souvenirs from Mexico, Ukraine, Korea, Iraq, Kuwait, Italy, France and a few other
places! The rug was a recent purchase from a local discount chain. I love this room. It's super comfortable.
Another view of our living room shows old wicker chairs we bought about 8 years ago, a cool drum our neighbor gave the kids (and I thought we were friends!), and kid art on the wall.

Is the room "finished"? Not by a long shot! I don't think it'll ever be done. Like my family, this room will evolve. I'll change pictures, add more layers, replace broken items or just replace items that need replacing. For now, I'll enjoy the fun of making this room us-until we and it changes.