Life has been incredibly stressful lately. And when I get stressed, I shut down and ignore my blog. I've been dealing with some mild health issues and trying to stay afloat of our daily life. Hopefully as things start to get better (or worse, I don't know), I'll be able to post more.
Since my last post, we've:
1. Bought new windows because every window in the house was a single pane, 1960s window. Two of the windows even boasted broken glass. It needed to be done, but 20 windows was pretty expensive. I'm looking forward to being able to clean the glass and water my flower boxes without taking my life into my own hands. Unfortunately, the install will be in September, but it's worth the savings!
2. The kids and husband spent a few days in North Carolina. Trust me, it was a vacation for me too!
3. We had a beach day with my mom, sister and niece and have a wonderful time!
4. My daughter turned 4 years old! Holy cow! We bought her a bike, and celebrated by going to the beach and baking her a strawberry pink cake. My daughter hates birthdays and cried every single time someone wished her happy birthday. She hates the birthday song and is terrified that someone will sing it!
5. I rearranged the house yet again. I moved the dinning room into the living room and the living room into the family room. The guys measuring our windows are confused as hell. I wonder if I should mention I plan on playing musical bedrooms in the next month...
I'm really looking forward to my son's birthday coming up in two weeks. I plan to make him a chocolate sheet cake with his favorite toy on top. As for gifts, he's getting a zoo-zoo pet, a desk lamp and we're moving his room and redecorating it. That's what he wants! I can't wait!
Thursday, July 29, 2010
Monday, June 7, 2010
Hitting the Deck!
I love our deck. It's a second story, covered deck that looks out over our back yard. The location and roof allow for cool breezes to pass through while keeping the hot sun off my pasty face. I spend hours lounging on the deck, reading, talking with friends or watching my kids play below.
Unfortunately, the deck is old and is definitely showing its age. The red color was peeling off and the wood was cracking. It had only been 2 years since we last stained it! The husband and I decided that it needed a good cleaning and staining to take it from a peeling, rough mess, to a smooth place to relax again.
Our first step was to power wash the deck and house. We rented a power washer from Home Depot for $75.00 a day. After researching our options, I found the best deal for us was to actually rent a unit. Most washers within our budget offered too low pressure and/or multiple complaints that the washer broke after one use. Plus with a rental, we don't have to store one more thing in our shed!
As usual, I totally forget to get a before shot.
 When it comes to deck stain, price wasn't our primary focus. We wanted quality. The last stain we used went on very poorly. The stain went on spotty and it actually peeled up within a few days of application. I wish I could remember the brand, so we can avoid it forever and ever. Anyway, I happen to love Behr interior paint. It goes on so smoothly and evenly. Additionally, Behr deck stain was only $25.00/gallon with a $5.00 rebate. This was more than $13.00 cheaper than any other brand we checked out. So, we decided to try it out and boy are we glad we did!
 But so much more relaxing! Onto the next item on our list!
Unfortunately, the deck is old and is definitely showing its age. The red color was peeling off and the wood was cracking. It had only been 2 years since we last stained it! The husband and I decided that it needed a good cleaning and staining to take it from a peeling, rough mess, to a smooth place to relax again.
Our first step was to power wash the deck and house. We rented a power washer from Home Depot for $75.00 a day. After researching our options, I found the best deal for us was to actually rent a unit. Most washers within our budget offered too low pressure and/or multiple complaints that the washer broke after one use. Plus with a rental, we don't have to store one more thing in our shed!
As usual, I totally forget to get a before shot.
Imagine a picture of a peeling, ugly deck floor here. Thanks.
Step two was to stain the deck. Because our deck was already stained red, we decided to just keep staining it red. After researching various stains brands, we settled on Behr.
When it comes to deck stain, price wasn't our primary focus. We wanted quality. The last stain we used went on very poorly. The stain went on spotty and it actually peeled up within a few days of application. I wish I could remember the brand, so we can avoid it forever and ever. Anyway, I happen to love Behr interior paint. It goes on so smoothly and evenly. Additionally, Behr deck stain was only $25.00/gallon with a $5.00 rebate. This was more than $13.00 cheaper than any other brand we checked out. So, we decided to try it out and boy are we glad we did!This stain went on evenly and smoothly. We didn't use a paint sprayer as I'm afraid that would have made a huge mess of our freshly washed siding. We used good old fashioned paint brushes. This stuff is so awesome, we only needed to apply one coat. After only 5 hours of manual labor in 90+ degree, super humid weather (because that's the only kind of weather here), we had a lovely, if not bright red deck.

Yup, it's definitely red!
 But so much more relaxing! Onto the next item on our list!
Tuesday, June 1, 2010
Slow and Steady-The Kitchen Table
Amazing things happen when you're not paying attention. Today, I stepped back and noticed all the work hubby and I have accomplished over the last month on a very limited budget.
The first project begging to be completed was our kitchen table. I enjoy cooking and spend a lot of time in our eat-in kitchen. The kitchen set stared at me every day begging for help. This was the first piece of furniture given to my husband and I. My grandmother bought this for us at an antique auction (though I doubted it was actually antique, vintage yes, but not antique!). My grandmother was one of my best friends and unfortunately, she passed away about 6 years ago. Consequently, the table holds sentimental value and I will not get rid of it. Bring on the sander!
Unfortunately, I am too impatient to get before pictures, so my afters are never that awesome. Oh, well. Next time, right? I finally finished staining and painting our kitchen table. The last 10 years of cooking, crafts and school work were very much evident. From broken spindles to worn-off stain, this table set needed help!

Sorry, this is the only picture I have of the table. As usual, I don't have a picture without a kid or dog evident. This picture really does show how worn the edges of the table were.
I sanded the table top down until it was completely bare. I added cherry finish and 3 coats of poly and ended up with this!

Look, not dog or kid in the picture (pay no attention to the dog bowl!).
Next up were the chairs and table base. Because I'm too lazy to prep all those spindles I wanted to change things up a bit, I decided to spray paint and poly these guys a lovely blue.

And here is the table set now.
 There are four matching chairs, but I use the highchair for our daughter. Since I'm not trying to sell our house, I see no reason to stage it for anything other than our everyday use.
 And finally, here is the table and chairs as seen in the kitchen.

Now my beloved table and chairs looks fun and fresh in our kitchen. I searched through the house and came up with the shelves, plates, pictures and cornucopia to freshen up our eating nook even more. The best part? Now, the table is a cinch to clean. Food and liquids wipe right up without leaving stains.
Total cost of the makeover was around $35 for spray paints, stain and poly.
Friday, April 23, 2010
Refinishing The Kitchen Set
What do you call this?
 Or this?

Progress!
Not only is this maple table and chair set a sturdy solid wood, it also has sentimental value. My grandmother bought the set for me and my fiancee (now husband) at an antique auction. It was the very first piece of furniture we received for our new lives together. So, despite that the style of table isn't something that we love, nor has the last ten years been kind to the finish, we, okay I, cannot replace it. To make the set more fun and to suit our taste more, I decided to refinish the table and paint the chairs. I truly considered refinishing the chairs. But did you see all those spindles? That's nuts! I need color other than maple!
I spray painted the chairs peacock blue and refinishing the top of the table. The only thing left is the table base. I cannot tell you have good it feels to make some progress. My goal for next week is to finish up the table base and put our kitchen back together!
Thursday, April 22, 2010
Third Times a Charm?
I am wall decor challenged. I require several attempts to get my wall decor to not suck look right. For example, I started out with this lovely vintage quilt and quilt rack.  While I loved it, the quilt didn't really work for the look I was trying to achieve. So, out went the quilt and rack and in came some plates and pictures.
 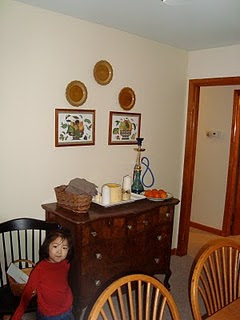 But, I decided the pictures weren't really working for me either. In came a mirror that I found around the house and painted.
 The dining room is starting to look differently now. We added new peacock blue curtains (a total splurge), a rug (given by my mother) and a few new-to-the-room plants and accessories. Oh, the blue chairs belong in the kitchen. Look forward to a blog on the refinished kitchen set next week. When we have guests over for dinner, we just pull a kitchen set chair up to the dinning table for a funky, coordinated look.
  Unfortunately, the mirror was all wrong and I didn't love the plates. None of the items matched anything in the room. Enter the picture collage. I like the look of a picture collage, but wasn't sure how one actually achieved it. After studying pictures online, I decided to attempt it on my own using new pictures of my children, some kid art and wooden frames I had lying around the house.
  I can finally say that this arrangement makes me happy because it includes only items I love. The middle pictures are my children from their photo shoot a month ago (a gift from my sister) and the other two pictures are art projects from my son. The picture to the left is an oil pastel and the picture to the right is a tissue paper creation. The hookah (no, we don't actually use it) was a fun little souvenir my husband picked up in the Middle East last summer and the plant was also a gift from my husband. The peacock plate was a gift from my mother. And finally, the dresser is a family heirloom that only adds to my enthusiasm over the wall make-over.
While I loved it, the quilt didn't really work for the look I was trying to achieve. So, out went the quilt and rack and in came some plates and pictures. But, I decided the pictures weren't really working for me either. In came a mirror that I found around the house and painted.The dining room is starting to look differently now. We added new peacock blue curtains (a total splurge), a rug (given by my mother) and a few new-to-the-room plants and accessories. Oh, the blue chairs belong in the kitchen. Look forward to a blog on the refinished kitchen set next week. When we have guests over for dinner, we just pull a kitchen set chair up to the dinning table for a funky, coordinated look. Unfortunately, the mirror was all wrong and I didn't love the plates. None of the items matched anything in the room. Enter the picture collage. I like the look of a picture collage, but wasn't sure how one actually achieved it. After studying pictures online, I decided to attempt it on my own using new pictures of my children, some kid art and wooden frames I had lying around the house. I can finally say that this arrangement makes me happy because it includes only items I love. The middle pictures are my children from their photo shoot a month ago (a gift from my sister) and the other two pictures are art projects from my son. The picture to the left is an oil pastel and the picture to the right is a tissue paper creation. The hookah (no, we don't actually use it) was a fun little souvenir my husband picked up in the Middle East last summer and the plant was also a gift from my husband. The peacock plate was a gift from my mother. And finally, the dresser is a family heirloom that only adds to my enthusiasm over the wall make-over. Truly the best advise I ever read on decorating is to use only what you love. If you follow this, you'll have more fun, and you can't go wrong. Or if you do something that is "wrong", you don't care.
Wednesday, April 21, 2010
PB&C Cookies
Last night, the kids (okay, and me too) were clambering for cookies. Unfortunately, when I checked my baking supplies, I found that I didn't have enough flour to make most recipes I know. So, I came up with my very own recipe using only the ingredients I had on hand (which wasn't many).
With no flour, eggs, brown sugar or butter, imagine my shock at how good these cookies turned out! My husband loved them and my co-workers requested the recipes. I hope you all can enjoy them too.
PB&C Cookies
Ingredients
*1 Cup sugar
*1 Cup corn syrup
*12 oz jar peanut butter (crunchy or creamy)
*2 Tbs vanilla extract
*6 Cups Corn Chex cereal
Directions
In a sauce pan, bring sugar and corn syrup to a boil. Remove from heat. Add peanut butter and vanilla extract and stir until smooth. Add in cereal one cup at a time. Stir until cereal is thoroughly coated. Scoop out tablespoons of mixture onto wax paper and refrigerate.
Sorry there are no pictures. They were eaten before I even thought to take a picture.
Monday, April 12, 2010
Why Isn't It Shrinking?
And by it, I mean the to-do list! Our list was reasonable:
1. Finish the laminate flooring in our family room-80% done!
2. Finish the stairs-started!
3. Repaint/redecorate the family room-80% done!
4. Refinish/repaint the kitchen table-started!
Just as we were finally making progress on our house projects, spring has arrived with it's annoying sunny warm weather, beautiful new flowers and green grass. The nerve!
Now, we are looking at the gardens that need weeding, the lawn that needs seeding and the deck that really, really needs refinishing. Oy. In an effort to keep me from freaking out, we chose not to do the veggie garden this year and concentrate on maintenance stuff only. I know I'm going to miss it terribly, but I really do not have the time.
Stay tuned for picures of our newly decorated family room, staircase and kitchen table set!
Wednesday, March 17, 2010
Inspiration Piece!
So, the family room. Again. No, wait. Still.
Carl was having difficulty selecting anything for the family room . At the same time, I was trying to give him space to select something he'd love. Unfortunately, Carl couldn't seem to find anything he liked. Not art, not fabric, not a rug. Nothing inspired him (his words, not mind).
Being the wonderful wife that I am, I narrowed it down for him. I emailed him the link to rugs from Overstock.com and gave him a $500.00 budget. Now, if you ever looked at Overstock's rug selection, you'd know that I only narrowed his search marginally. From researching blogs, I understand that the rug is the hardest thing to find, so it's best to start with the rug.
After several weeks, Carl finally selected this rug.

I'm so proud of my hubby. He picked this gorgeous 8' x 11' wool rug all by himself. He carefully reviewed the cost, materials, and customer comments before telling me what to buy. He even suggested a paint color and window panel colors that I think will look fantastic. I think he'd been hiding a secret decorating talent! Should I be thrilled that he's so good at this, or annoyed he's been holding out on me?
Carl was having difficulty selecting anything for the family room . At the same time, I was trying to give him space to select something he'd love. Unfortunately, Carl couldn't seem to find anything he liked. Not art, not fabric, not a rug. Nothing inspired him (his words, not mind).
Being the wonderful wife that I am, I narrowed it down for him. I emailed him the link to rugs from Overstock.com and gave him a $500.00 budget. Now, if you ever looked at Overstock's rug selection, you'd know that I only narrowed his search marginally. From researching blogs, I understand that the rug is the hardest thing to find, so it's best to start with the rug.
After several weeks, Carl finally selected this rug.
I'm so proud of my hubby. He picked this gorgeous 8' x 11' wool rug all by himself. He carefully reviewed the cost, materials, and customer comments before telling me what to buy. He even suggested a paint color and window panel colors that I think will look fantastic. I think he'd been hiding a secret decorating talent! Should I be thrilled that he's so good at this, or annoyed he's been holding out on me?
Tuesday, March 9, 2010
Find of the (Mid) Century!
 Last Friday, during my lunch break , I drove on over to our local Goodwill for some fun. I'm only looking for furniture [right now] and was on a very limited schedule, so I carefully avoided the clothing and book sections. And there it was. Have you ever experienced that moment when you found your it? The exact item you never knew you needed, but knew you needed?
There in all it's glory was this entertainment center.
Oh dear. It's exactly the style my husband likes and wants for our family room-mid century modern. I approached the piece slowly lest someone else realize how awesome a find this was. The piece was in good shape. It even had dovetail joints and groovy 70s drawer liner. And we needed a new entertainment center to hold games and toys. The last one we owned (a horrible shabified yellow monstrosity) met up with our son in a dark room and didn't come out alive. Oh, it gets better. Total cost? $12.00. Yup, my pulse started to quicken. This was it! And it must be mine!

But wait. I didn't have the truck, nor does Goodwill hold anything. I rushed back to work, called Carl (the husband who owns a truck)and begged him to pick up this fine piece for me after work. This guy, he didn't even ask why. He just went to Goodwill, bought me that $12.00 entertainment center along with a bouquet of wild flowers and brought it home.

Truly, I don't know who was more excited, me or the kids. They knew exactly the purpose of the entertainment shelf as soon as they saw it-our new toy and game storage. The spent the rest of the night putting all their toys into the unit and exclaiming over its awesomeness. I may have created monsters.
Wednesday, March 3, 2010
I Am A Turtle
Why did no one warn me that home improvement can hurt! No, we didn't have any major accidents. I'm talking muscle fatigue. I run, do step aerobics, kick boxing, and various other workouts several times a week. None of these things have prepared me for laying a laminate floor.
Carl and I are currently plodding our way through our laminate floor installation project and it is taking us For-Ev-Er! We started on Sunday afternoon. It's now day 3 and we're maybe halfway done. Dang day jobs are just getting in the way. Add in feeding, bathing and homework with the kids and it makes for snail pace progress. At least there is progress, right? I just have to be patient and look on the bright side.
So, what is the bright side? Well, since we have a good portion done, I can already see that I love the floor. It looks great. Another bright side is the skills I'm acquiring. Hey, I can lay laminate floor with no help (not that I want to). I've also learned how to use our circular saw and the correct way to measure. Finally, and most importantly I'm learning patience-one thing I've always needed to work on.
Monday, March 1, 2010
Unexpected Progress!
Have you ever had unexpected progress? Recently, Carl (the husband) and I decided to fix up the family room. The plan was, well, wasn't even much of a plan. We has a direction-sort of. We're thinking something "grandma chic" (Carl's terms, not mine). So, something sorta mid-century modern-ish for my husband with some tranditional thrown in for me.
With this direction in mind, we've been searching through Ikea, Craigslist and Goodwill for furniture and accent peices. While we found some furniture we liked, nothing inspired us. We had no inspiration piece to work with. In the past, I've used art or fabric as inspiration pieces. I suggested that we try to find a really cool rug to work with, but unfortunately, the only rugs Carl likes are the flotki or sheepskin looking rugs. I'm pretty sure that these rugs will not stand up to two children, one eighty-pound doggy and one spiteful cat. So, we're still looking. Maybe one of those Sisal rugs?
While I am in no hurry to complete this renovation, something happened to speed it along. Enter, a sale on laminate flooring. That's right, laminate flooring went on sale at Costco for more than $8.00 off per box. This equals over $280.00 in savings if we bought it in February. So, Carl bought about 700 sq. feet of flooring, loaded it up on the truck and brought it home. And there it sat for about a week.
And then something wonderful happened. Carl started ripping up our gross carpet. Ever rip up carpet? Makes you never want to have carpet ever again! And so, we have officially started laying our new floor and I love it. Well, the floor, not actually installing it. So, right now, the house is a disaster and everyone feels discombobulated, but we are loving the progress. Bonus points for the floor since we've already has polyurethane, blood and vomit wiped right off of it (oh, the joys of parenthood). Here's a peak of the flooring so far!.

Tuesday, February 23, 2010
Apple Sauce Granola
My family loves granola. It's so easy and inexpensive to prepare, that I make it often. I've tweaked a few recipes to fit my family's tastes and dietary requirments. The results have been so well received, I thought I'd share the recipe.
3 cups rolled oats
1 cup sliced almonds (any nut can be substituted)
1/3 cup brown sugar
1/3 cup maple syrup
1/3 cup apple sauce
3/4 teaspoon salt
1 cup raisins, if desired (I usually leave this out)
Directions:
Preheat oven to 250 degrees. Mix oats, brown sugar, maple syrup, apply sauce and salt together. The mixture should be chunky. Empty oat mixture onto a 9"X13" pan and bake. Stir granola every 20 minutes until the granola is dried approximately 1 hour 10 minutes. Remove from oven and mix in raisins. Store in an air tight container. I reuse old oatmeal containers or old jam jars for this purpose.
Granola is such a versatile treat. We eat it for breakfast in a bowl of milk, or we top our yogart with it. It even makes it's way into my son's lunch box. My husbans favorite use for granola is as an ice cream topper. I love that I can tweak the recipe whenever my mood strikes. For example, sometimes, I add peanuts or craisons. Often, I leave the raisins out all together. It's always good!
Monday, February 15, 2010
Compromise
My husband and I have been married a little more than ten years and in those years, we have both learned to compromise. Luckily, neither of us is particularly stubborn. One area of compromise has been our house. Everything from purchasing it, to painting and decorating it was a compromise-mostly for hubby. I'm embarrassed to admit that I've struggled in this area. Hubby likes modern or retro looking stuff. He loves Ikea. I don't. Actually I like it alright. The problem is that our house is full of free, second hand furniture. The result was a causual, country, traditional mismash of stuff my relatives all liked at one point in the last 20-30 years. How in the world does danish modern fit into the mix? To be honest, I don't know. But, I think it's about time, we added some items into our home not because they are free, but because we actually like them. I want hubby to feel like our home reflects some of his personality too. With this in mind, I suggested that that hubby decorate our family room with furniture and accessories that meets his discerning taste. Suddenly, hubby wants to help with home projects! Jackpot!
Now, where do we start?
Let's look at the current state of our family room. It contains 1 new television on a cheap pine stand, 4 small storage cubes that act as toy boxes and 1 cheap, broken armoir full of games and toys. The picture below shows the room with an old couch that long since died (via the cat) and a treadmill that I used (really!) until it broke. Apparently, it's not uncommon for the repair of exercise equipment to exceed the cost of a new one! Neither item resides in our home any longer. The small child is still here and will likely show up in random future pictures.

And here is a view of the summer kitchen (aka the brewers kitchen).

After tons of discussion, hubby and I realized we needed to do the following things:
1. Paint (again)
2. New flooring (I didn't mention the water damage and iron mark yet did I?)
3. Remove the shattered tile and replace it with something. This will also involve removing a window that looks out into our garage.
4. Put in the new AC unit (which we already have)
5. Get a couch for goodness sake! Maybe even a table?
6. Come up with some sort of entertainment system
7. Come up with some sort of toy storage
8. Accessorize!
I cannot believe how excited DH is about this project. He actually agreed to go window shopping for furniture ideas this weekend. I couldn't have been excited if he asked to help me clean.
Friday, February 12, 2010
Even Terrible Pictures Help!
I know I kinda suck at taking pictures. Clearly, that hasn't stopped me. Taking pictures of completed projects helps me see what is wrong or missing. Who knew? Well, probably a lot of people, just not me.
For example, taking pictures of our dinning room made me realize that the pictures are hung too high. It wasn't obvious to me at first because I'm tall (right around 6'). Eye-level to me may be 4 or 5 inches too high. Another example was in our living room window treatments. I always liked my sheer, off-white curtains until I saw the photos. The windows were screaming for window treatments with color.
Maybe this explains why I prefer my picture not be taken.
Simple Pleasures-Kid Art

What happens when you give two kids 4 jars of finger paints, a pad of paper and hours to create? Awesome kid art! I am the proud owner of many original pieces of kid art. I just pop the paintings into a frame with a mat. Instant wall art!

I love how it keeps the house more fun and casual-just like us!
Thursday, February 4, 2010
Yearning for Spring
Nothing makes me yearn for Spring like an impending blizzard. According to the weather predictions I hear, we have a 100% chance of snow this weekend. Not just a dusting of snow either. We are anticipating a blizzard! While I feel fortunate that we have a warm house to keep us safe, I cannot help but yearn for Spring. Spring means green grass and new plant growth and gardening!
 I may have mentioned a time or two that my husband and I love gardening. I love the feeling of dirt on my hands and sun on my back. I often forget to wear a hat and gloves in my eagerness to get my hands dirty. I lose all sense of time when planting and weeding. My garden is my happy place.
  My husband must be yearning for Spring too. Yesrerday, he came home with a new house plant. That makes 8 houseplants in our livingroom/dinning room. I enjoy live plants in our home, so I was pretty happy to see our newest addition-a Golden Pothos also known as Devil's Ivy. Pothos is a common house plant. Despite this, I have never owned this variety of plant. It's supposed to be easy to maintain-low light requirements and not too much water is needed. I think this plant is just what we need to hold us over until Spring.
I may have mentioned a time or two that my husband and I love gardening. I love the feeling of dirt on my hands and sun on my back. I often forget to wear a hat and gloves in my eagerness to get my hands dirty. I lose all sense of time when planting and weeding. My garden is my happy place. My husband must be yearning for Spring too. Yesrerday, he came home with a new house plant. That makes 8 houseplants in our livingroom/dinning room. I enjoy live plants in our home, so I was pretty happy to see our newest addition-a Golden Pothos also known as Devil's Ivy. Pothos is a common house plant. Despite this, I have never owned this variety of plant. It's supposed to be easy to maintain-low light requirements and not too much water is needed. I think this plant is just what we need to hold us over until Spring.Saturday, January 30, 2010
Gosh, I Have A Lot of Stuff!
If you read through my January posts, you'll notice that I've been on a home decorating kick. I've been trying to fix up our main floor as inexpensively as I can using stuff I have around the house. Our main floor consists of our kitchen, dinning room, living room, bedroom and a full bathroom. Incredibly I've been able to decorating all five rooms and the hallway on a very limited budget.
For all five rooms, I purchased:
1. Three pictures
2. Drapes for four windows
3. One rug
4. Four toss pillows
I used a lot more than just those items listed above to finish each room. The rest of the items were found in the house. Some items such as a wall shelf and plates were being used in a different room. The rest of the items such a candles, more plates, vases, plants and a wine rack were found in closets or drawers. It was like going on a treasure hunt!
Ironically, I pride myself on our lack of clutter. I make frequent trips to the Goodwill or Salvation Army. So, I'm not sure if I should be embarrassed that I have so much stuff laying around, not used, or proud that I did all the decorating on such a limited budget.
Regardless, I truly thrilled at how homey our little house is becoming right in front of my own eyes!
Thursday, January 28, 2010
A $100 Dinning Room.
Finally, our dinning room is starting to actually look like a dinning room and not just a room with a big table in it. I'm so excited, I thought I'd share.


So, what have we been up to? First, Hubby and I removed a wall. Turns out, that wasn't as fun as all you DIYers make it out to be. The walls were uneven and couldn't be patched evenly. Twelve layers of mudding and sanding later and we called it a day. We are still working on the flooring (that needed to be replaced since walls were removed), but that's another post. Oh, and we aren't done that yet.
Bye-bye wall!
After the wall was removed, and the dust cleaned, I was left with a pretty blank slate. The room was painted off-white, with off-white curtains and gross blinds. As for furniture, I had my grandmother's oak table and my Great Aunt's antique dresser. My challenge was to make this mess of stuff look like it belonged together. Oh, and as usual, the budget was tight.
The Plan:
1. Repaint the wall Antique White
2. Move Antique Dresser out of closet
3. Find new window treatments
4. Create a kid area
5. Hang some art and the wine rack
6. Accessorize
The After Shots


It's so hard to get a shot without a kid or dog in the picture. Anywho. Here it is, my dinning room.
Cost breakdown:
1. Paint: $20.00 (I had the brushes, trays and rollers)
2. Curtains: $40.00 (I reused the off-white voile ones and added brown voile)
3. Two new fruit pictures $32.00 (includes prints, mats and frames)
4. Rest of the accessories are from around the house. Yes, we have fresh flowers in our house most days. I just relocated them from our kitchen.
Grand Total: $92.00!
Now we can afford to stock the wine rack too!
Monday, January 25, 2010
Weekends Aren't for the Weak!
This Sunday marked the first day since January 1st that my husband and I both had a day off of work. Woo Hoo! Unfortunately, we didn't relax and hang out with the kids. We got to work on the loooong list of projects waiting to be done. The list looked something like this:
1. Remove toddler bed and set up bed in daughters room-DONE
2. Clean house (top to bottom)-DONE
3. Find a flooring option for entry (to cover holes made by removing walls)-DONE
4. Install floor- Floor installed-trim not
5. Purchase items to hang wall art and wine rack-Items purchased, but not installed
6. Go to the grocery store and purchase food for shelter-Bought all buy 2 items
7. List items on craigslist-DONE (if only they'd sell)
8. Paint hallway-Not even started
9. Check out Goodwill for curtains-DONE-nada
10. Check out Walmart if Goodwill produces nothing-DONE-nada
Did we accomplish all that? No. Did we get a great start? You betcha!
Monday, January 11, 2010
Five Years Later
Five years ago, on a surprisingly balmy January day, we moved into our little house. On that winter day, we paused to take a look at the house before we walked in for the first time as the new owners. The house wasn't winning any design awards, or even admiring glances. It's a 1966 raised ranch complete with original bathrooms, black and white tiles and 70s appliances. The exterior had not been updated. Worse yet, there wasn't a bush or tree to be found on the small, 1/4 acre lot. Heck, there was barely grass as it was January. But, it did have what we needed-a move-in ready, 4 bedroom house with an in-law suite potential in the a good location within our budget. We could have afforded a nicer home, but we'd have had to look further away from our work, family and friends. Besides, I am a product of HGTV and thought we were up for the challenge.

This is our first view of the house. Yes, that is the front of the house. No, I didn't love it either. But I could see the potential. My husband may have hated it on sight. I may or may not have begged to put in an offer and my husband agreed. The offer was accepted the next day. Ah, 2004/2005 boasted a quick moving real estate market!
 Yes, that is the front of the house. No, I didn't love it either. But I could see the potential. My husband may have hated it on sight. I may or may not have begged to put in an offer and my husband agreed. The offer was accepted the next day. Ah, 2004/2005 boasted a quick moving real estate market!
I loved this house for so many reasons:
*It was very structurally sound. The original owners (also the contractor) sold it to us and kept the house in good shape.
*I liked that it was so symmetrical.
*It has two, yes two kitchens (one for beer making and for food making)!
* It had enough room for our hopefully expanding family.
* The house was less than 10 minutes from our jobs, family and friends.
* The house was in a good school district.
Fast forward 5 years and we've seen a lot of changes in both our family and in our home. Our daughter joined our family in 2007. My husband has seen two tours in the Middle East. My mother and sister have moved in and then moved out. We've seen my son start school, learn new sports and developing his personality. We've all grown older and, dare I say, happier. Life has been good.
We love our home more and more every year. Each passing day, new memories are made. Because we enjoy our home, we are trying to slowly update it and make it more homey. Since we plan to live here until retirement (30ish years), we are making it a house we love, not a house that will sell. And that is so much fun!

By 2007, We'd already changed out the exterior by adding siding, brickwork, and landscaping. You can really see the brickwork and vinyl siding in this picture. What you can't really see is the 8 bushes/trees we planted. We couldn't afford mature/larger plants, so we bought the smaller ones. Well, 5 years later, each of these bushes are 3-6 feet tall each. We've also added rose bushes and an apple tree to the front yard, and extensive gardens to the back and side yards. Gardening is something we do as a family. I love looking at the pictures and seeing how our leland cypress's have grown almost a foot a year!

We still have so much to do both in side and outside the house. Again, it'll be done slowly. We're in this house for the long hull, so what's the hurry?
Thursday, January 7, 2010
Leftover Soup-Mock Maryland Crab Soup

While cleaning out the fridge, I managed to come up with another great soup recipe! So, I thought I'd share it with you all.
Mock Maryland Crab Soup
2 Tbs olive oil
1 Small onion, chopped
2 cups chopped, cooked white meat (I used a combination of leftover pork and chicken)
1 10.5 oz. can tomatoes with chilies
1.5 cups mixed frozen veggies
1 10.5 oz. can of beans (black or kidney) OR black eye peas
4 cups of chicken broth (or 4 cups of water and 2 bullion cubes)
2 tsp Mrs. Dash Original Seasoning Blend
Salt and Pepper to taste
In a soup pot, brown onions in olive oil. Add white meat and can of tomatoes w/chilies, frozen veggies, beans and chicken broth. Simmer 5-10 minutes and add Mrs. Dash Seasoning, Salt and Pepper. Simmer another 5 minutes and Viola! Mock Maryland Crab Soup. This was great with a garden salad and corn bread.
Oh, I just have to warn you that this is a little spicy due to the chilies. If you don't like spicy food, just use a plain can of tomatoes.
Tuesday, January 5, 2010
My Decorating Method
 I have a confession. I love to read decorating and home improvement blogs. Love them! I can read them all day. In fact, I often do. All the DIY and decorating posts are inspiring. Unfortunately, our budget doesn't allow for me to acheive the beautifully decorating homes these talented DIYers display. Well, at least not quickly.
My "method" if one could call it a "method" is to slowly, and I do mean slowly, decorate/update our home using found treasures. I search through craigslist, local thrift stores, discount stores and even our own home to find just the right accessory to add to each room in our home.
Take my living pictured to the left. We've lived in our house 5 years and it took that long to even get to this transitional point. Everything on the mantel was found from inside our home just this week, the picture was orinally in our family room, but I loved it so much I decided to use it in a more prominent place in the house. The clock is an antique handed down by family members and everything in the curio was purchased on one of our travel adventures. We have souvenirs from Mexico, Ukraine, Korea, Iraq, Kuwait, Italy, France and a few other
places! The rug was a recent purchase from a local discount chain. I love this room. It's super comfortable.

Another view of our living room shows old wicker chairs we bought about 8 years ago, a cool drum our neighbor gave the kids (and I thought we were friends!), and kid art on the wall.
Is the room "finished"? Not by a long shot! I don't think it'll ever be done. Like my family, this room will evolve. I'll change pictures, add more layers, replace broken items or just replace items that need replacing. For now, I'll enjoy the fun of making this room us-until we and it changes.
Subscribe to:
Posts (Atom)