Saturday, June 25, 2011

Oops! Paint, I LOVE YOU!

I always have good intentions to finish one project before I start yet another. Yet, sometimes I just cannot pass up a deal. Then, I get so excited by said deal that I have to start the new project as soon as I get home.

Case in point, last weekend, while buying crack sealer at Lowe's, I happened upon the Oops paint section. I have no clue how I ended up in this section, but I did. Imagine my delight when I found a lovely aqua paint in my favorite brand-Valspar Ultra Premium in semi-gloss. It was the exact color I wanted to paint my daughter's dresser. And it was only $5.00.

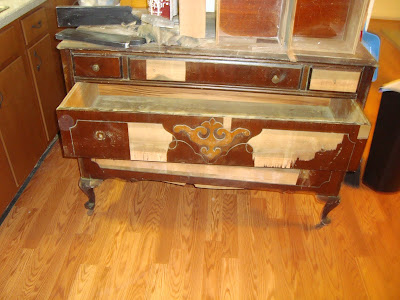
Here's the dresser before.

My mother found this dresser (along with a matching vanity and night stand) at an estate sale for around $125.00. She didn't notice that it was pretty stained up until after she bought it and loaded it onto the truck. That was no big deal. The bedroom set was in fantastic shape otherwise.

Finally, 10 months later, I stumble upon the aqua paint. And the next day, I painted the entire set. Here's the after.
I left the handles as is because the mirror and headboard match and I was undecided on which way to go. I love how it turned out.

This was by far the easiest piece of furniture I have ever painted. I just sanded it, primed and painted it with two coats and used a roller. That's it. Now, I just have to finish decorating my daughter's room. I'm so close now, I can just see it!

Linking up!

Wednesday, June 22, 2011

New Neighbors

About two weeks ago, we had a new family move into the house across the street. As soon as I saw the For Sale sign come down, I prayed that a nice family with kids would move in. We have a lot of older neighbors, and wanted a family like ours to join the neighborhood. Well, the good Lord heard my prayers and I spied a lovely family with two young children bringing in moving boxes.

I wanted to go over there and introduce myself right away, but for some reason I hesitated. I'm not particularly shy, so why hesitate? I am embarrassed to admit that I am often paint covered and filthy from working in the yard.
See, this is just my hand from our playhouse project a few weeks ago.

While doing yard work, my kids often join in and are equally filthy. Okay, they are just plain gross. Even I can't deny that!

I have yet to meet a new neighbor for the first time when I wasn't gardening. True story, my husband unexpectedly arrived home one day from his year long deployment overseas only to find me knee deep in our compost pile. That's right, not only was I covered in dirt, but rotting food too. I can't believe he didn't run away terrified. But at least he's seen me dirt free where as the new neighbors have not. I did not want the neighbors to think that my family was the filthy stinky one.

Finally, I realized that being stinky is not nearly as bad as unfriendly. And if I wait until the kids and I are clean and they're home, we'll never meet. So, one day after my run (because at least I wasn't actually covered in mud), I noticed they were home. I grabbed some freshly baked banana bread and walked up to their house. I let the kids ring the door bell so I could stand back a little (so the smell didn't hit them right away).

Thankfully, the new neighbors were too polite to say anything about my less than lovely appearance and welcomed me into their home. The family is a wonderful family with two small children, just as I hoped for. I cannot wait to get to know them better!

Sunday, June 19, 2011

What I've been Working On

What exactly is this? This is a hot mess that's what!To be more specific, this is an old dresser that is part of a bedroom set belonging to my mother (additional pieces include a vanity and headboard in equally bad shape). Unfortunately, my mother had to put this little dresser, who once upon wasn't such a mess, into storage. Even more unfortunate is that her storage unit flooded ruining majority of her furniture. It was awful to see beautiful wood furniture warped and pealing beyond repair. Many of the items held sentimental value to her. This dresser was one of those items that had more sentimental value than monetary value. While old, it was made from cheap pine and laminate. Fortunately, the water damage, while bad, wasn't impossible (for me) to repair. None of the wood was warped, but the laminate was pealing. This I could work with!

So, I've been working on this dresser and the matching vanity for the last two months. Yes, I am that slow. I've been peeling, stripping, patching and sanding these pieces over and over and over again. I'm not going to lie, this project hasn't been easy. And had it just been for me, I would have just scrapped the thing. But I'm working on this for my mom. Hopefully, when she sells her current home, she can find a place in her new home to fit her precious family antiques.

Here's a sneak peak of the project so far. I think this shabby chic paint job is kind of interesting, but I know my mother would hate it, so this is an in-between peak. More to come!

Happy Father's Day!

To my wonderful, husband, have a happy, fun-filled Father's Day. We love you!

As is typical, I waited until the absolute last minute to worry about a Father's Day present that shows how much we love and appreciate my husband. And by last minute, I meant Father's Day morning at 6:30 am.

After casually asking what he would like for breakfast (at 6:00am), I headed out to the grocery store to pick up his request item-cereal. Yup, I can and was willing to make whatever he wanted for breakfast, but he wanted cereal. So, I sneaked out this morning and bought his favorite cereal-Cinnamon Toast Crunch. I even splurged on the name brand! To round out the order (and because I haven't been to the grocery store since we returned home from vacation), I also added
  • 1 dozen collousal-sized donuts (it really was cheaper by the dozen) freshly baked
  • 1 bunch of bananas
  • OJ
  • Fresh Milk
  • Freshly ground coffee
  • 1 bunch of assorted flowers
Then, I quickly scribbled a card together and added it to the table of food. I think he enjoyed his carb feast!

Goodwill Finds!

I often browse at our local Goodwill, but rarely buy anything. I'm pretty picky what comes into our house and I rarely buy anything I wasn't looking for already. For example, I am currently looking for
1. Picture for our bedroom
2. A few lamps for various rooms in our house
3. Butcher block table top

Imagine my delight when I walked into Goodwill and found this delightful little oil painting that matched the colors in our bedroom perfectly! It's signed and dated 1983!
It's a bit brighter in person which I really like. Our room is a bit dark and had a lot of hand-me-down 70s furniture. The picture matches the style of the bedroom perfectly! I paid $8.00 for the oil painting.
Next, I found this lovely floor lamp with a fantastic milk glass shade. I love milk glass and buy milk glass serving bowls for daily use for serving food and displaying in our kitchen. The base is also pretty heavy in comparison to many of the floor lamps I find in thrift stores(or regular stores for that matter!). I paid $15.00 which is what our Goodwill charges for all floor lamps

This lamp is perfect for our bedroom as it provides a light source for us as soon as we enter into our room (there are no light switches).

And finally, I found this adorable little desk lamp. I've got a few ideas on where to use it, but for now, I'm still undecided.
I paid $4.00 for this little beauty.

Notice that my lamps were antiqued gold? I am so glad this color metal is coming back. While I like the chrome/pewter look that we've all seen in the last trend, it matched nothing I owned (unless you include our faucets). Yeah for old becoming new again!

Monday, June 6, 2011

The Playhouse Part 6: The Budget

Like all home projects, we set a budget for the playhouse project. I set the budget at $300.00 Sounds kind of expensive, doesn't it? I thought so, but dang, good quality exterior paint is expensive (and worth the extra $$ IMO).

So, here's the cost breakdown (rounded)


Exterior
Paint $74.00
Plants/Potting Soil: $66.00
Planters $25.00
Trellis $12.00
Furniture $28.00
Mulch: Free
Total Cost (Exterior ONLY) = $205.00

Interior
Primer $50.00
Exterior Paint $52.00
Deck Stain FREE (previously on hand)
Curtain Rods $3.00
Furniture: Free-(previously owned)
Accessories: Free-(previously owned)

Total Cost (Interior ONLY)= $105.00

Total Cost of BOTH Exterior + Interior =$310.00


One of the reasons it's taking us so long to update our lovely home is that we are slowly saving for all repairs and paying in cash (or check as is usually the case). Since we were already over budget by $10.00, we decided that the extra little touches like trim mouldings (or gingerbread), hooks and mailbox could just wait. The kids don't miss them, so why should I. Rest assured, as soon as we update the playhouse, I'll provide a new after picture.

Exterior Cost $205.00. Interior Cost $105.00. Years of fun and play for the kids, priceless.

Sunday, June 5, 2011

The Playhouse Part 5: Painting and Decorating the Interior

Mr. A and Miss J.
You are invited to tea in The Playhouse.
Tea, strawberries and sweets to be served.
Come one, come all, come NOW!


Located at
The Playhouse
1443A Whitington Avenue
Xwwwww, XX, 55555

(Conveniently located in the backyard)

Hope to see you there!


This is the invitation the kids found stuck to the front door after lunch on Saturday. They cautiously made their way to our backyard. After a minute or two of looking around, they found the place!
Cautiously opening the doors, the kids found a delightful surprise-their very own playhouse! Come on in and have a look! As a reminder, this is what we started with.


And here's the surprise that awaited the kids when they opened the doors!
Green tea, strawberries and black bean brownies, oh, my!


Storage shelf with helmets, their adored pillow pets and plenty of space to add their own little decorating touches (which they already started to fill).
Outdoor toy box that doubles as extra seating. Favorite stuffed animals, Teddy and Sprinkle joined the tea party too!


The kids enjoy their afternoon tea. They were so excited, they didn't even eat the brownies!
Miss J takes it outside to enjoy a quiet cup of tea on their "patio".

Now, the kids are begging to take every meal out in their new clubhouse (their term) and to sleep there overnight. Too bad my less than youthful back refuses that treat. From the hours of silence hubby and I now have in the house, I'd say this project was a great success.


The Shabby Nest

Saturday, June 4, 2011

The Playhouse Part 4: Painting and Landscaping the Exterior

Wouldn't you know it, as soon as I decided to paint the exterior of the playhouse, the heat climbed to over 90 degrees. It's a good thing I love heat! After slathering on a ton of sunblock (because I burn and worry about wrinkles), and donning my painting cap, I tackled the exterior painting. My poor hubby isn't as heat tolerant, but still stepped up to help with the painting-thanks, Honey!

Two gallons of yellow and 1 pint of green paint later, and the exterior painting was done! I used the Valspar Duramax Semi-Gloss paint color matched to our house (called adobe cream by the siding manufacturer). Great paint. It was pretty expensive @ $37.99/gallon, but I understand it's excellent paint and we shouldn't have to repaint next year. While I was at it, I decided to finish the landscaping too.

Welcome to the new playhouse!
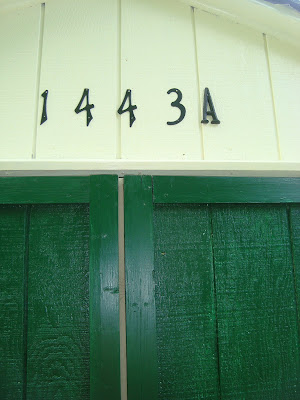
We added a hook and hanging basket on the right hand side of the doors and two barrels of flowers on either side of the doors. We wanted to be cautious of planting anything on either side of the doors just in case someone swung the doors a little too wide. We also added the address "1443A" above the doors.

On the right side of the house (side closest to our home), we turned the worm bin/yard compost into a vegetable garden. This little box contains 3 types of tomatoes and 2 types of peppers. I wanted to plant strawberries, but they are going out of season. Strawberries as also much more expensive then the vegetables plants! Having a garden for our kids is very important to us. We want them to see first hand where produce is grown. I have fond memories of picking fruit in the summer as a child and want my kids to have similar memories.

Directly next to the vegetable garden box is a little place to rest. We added two little green lounge chairs for relaxing and a metal and mosaic table for drinks. Behind the chairs, we added a trellis and a clematis plant. The clematis is still pretty small. Hopefully, it'll grow, grow grow this summer and be nice and full by summer's end. The trashcan next to the chairs is actually our potato experiment. We're growing potatoes in that can! And behind that bin is still our compost bin. This bin will stay since it's the only place in our yard that's appropriate (aka far enough from the house) for a compost bin.
On the left side of the playhouse, are the raspberry, blackberry and kiwi bushes. We just love going out to the yard and picking a few berries to sample! Don't you love the old clothes line pole? We only have one (left from the previous owners) and love using it for climbing plants. I think it's charming! You can also see one of the two windows here. I love the little green shutters. They are such a great little accent! The kids and I mulched the entire area from playhouse to fence for ease of access. My son is, at this very moment, planting sunflower seed along the edge of the house here. I cannot wait to see them grow!

We're still looking for running trim (or fretwork, or gingerbread) to go along the roof edge, but it's pretty tough to find. I also don't want to pay $60+ for a 4' section. It's only a playhouse for goodness sakes! I also want to add a small mailbox. I haven't found exactly what I'm looking for just yet. I'll find it eventually, I'm sure.

This run down little shed has come a long way, don't you think?


Next week, I'll share the interior and how we surprised the kids (who had no idea we were turning the shed into a playhouse). The interior, in my humble opinion is the best part of this makeover!

LINKING UP!
The DIY Show Off